No picture because despite my best efforts the yoghurt split and the whole thing looked a little unappetising because of it but it was much more delicious than it looked and so I'd certainly make it again.
Rigate in Italian means striped or in the case of pasta, ridged. The ridges hold lots of sauce and are most important for this dish but the actual shape of the pasta isn't too important so long as it is tubular. Ditalini, little thimbles, very short cut tubular pasta is often used instead of penne or other forms.
I was lucky enough to find some fresh peas in the local Somerfield supermarket. Despite the vast body of literature you can find supporting the frozen pea for taste and nutrition proper peas in their pods have a magic that's hard to beat. Grow them if you can, but don't miss buying them if they look fresh and young, because it is worth it.
This makes enough for four as a pasta course, three as a main course and two greedy people.
750g peas in the pod
250g penne rigate
garlic
saffron
soya yoghurt
cornflour
olive oil
sesame oil
freshly ground black pepper
Pod your peas, try not to eat too many as you do it. Put a huge pan of water on for the pasta and bring it to a good boil. Put a large pinch of saffron in a small bowl and add a couple of tablespoons of hot water.
In a deep frying pan put a splash of olive oil and a teaspoonful of toasted sesame oil and gently fry off your finely chopped garlic. I haven't given a quantity because everyone differs in how much garlic they enjoy. I used three cloves. Add the peas and stir around in the garlicky oil, season with black pepper, then add a few ladlefuls of hot water and bring to a simmer. Just how much you'll need is debatable, there should be enough to barely cover the peas so that they will cook in water but not too much or the sauce will be overly watery later.
Put your pasta into the fiercely boiling water and set a timer if you're like me and prone to forgetting how long it's had. Read the packet for timings.
Mix your saffron, its liquid, a 125g pot of soya yoghurt (or about that quantity) and a biggish teaspoonful of cornflour. My mistake I think, was insufficient cornflour but then I didn't want a custard, just to stop the yoghurt splitting. Good luck with that.
By now the water on the peas should have reduced and the peas will be tender. Carefully mix your yoghurt mixture into the pan to make a fairly liquid sauce that is golden and green with peas and will coat your pasta delightfully. When I did this I panicked and thought the sauce was too wet but actually it wasn't at all once the pasta was added.
Drain your cooked pasta well, mix into the sauce and serve, with a little chopped parsley over the top.
Tuesday, September 18, 2007
Sunday, September 16, 2007
There's posh
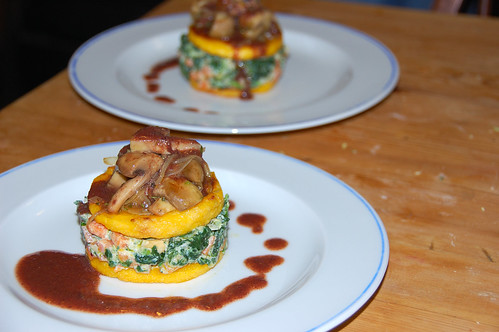
Few meals of note in the last week but these were a bit special and good enough to have two nights in a row (since I made enough for four where were you on Thursday!?).
Polenta rounds, cooked, cooled, cut and charred under a hot grill, layered with a creamy carrot, brazil nut and spinach stuffing and topped off with sauteed mushrooms and onions masked with a rich wine and porcini sauce.
We served them with a little steamed cabbage and some boiled potatoes drizzled with extra of that glorious sauce.
To follow, chocolate coconut iced. A work in progress, I think I need a better icecream maker but the flavour was good.
Wednesday, September 12, 2007
Jam don't shake
We seem to be moving away from the original purpose of this blog but it's hard to do cooking for one in Normandy when you're cooking for two (or more) in Newport Pagnell...
Anyway, on a walk on Sunday we found a hedgerow apple tree where the fruit, and I hesitate to call them crab apples because the tree looked more like a seedling from an eating apple, were heavy, dark and pendulous. Oh no, that's the Rocky Horror Show, I meant to say heavy, enticing and nearly ripe. So I picked a bagful.
This is what I did with my free harvest.
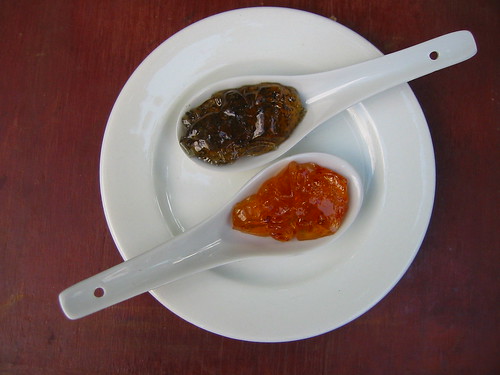
Actually I made more jelly than that, nearly 1.5kg I think although I've not weighed up, but jars are boring to photograph and this presentation nearly shows the luscious shinyness of the of the finished preserves.
To make, chop your apples up skins and all, just removing any bad or bruised bit and put in a thick bottomed pan with just enough water to cover the fruit. Gently bring up to a simmer and allow the apples to cook until they are soft and broken down. Mash them a bit to make sure all the pieces are fully cooked. Then set up your jelly bag and set the pulp to drip for several hours. Don't squeeze the bag if you want clear jelly.
After a few hours, measure your juice. I got 2 pints, 40 imperial fluid ounces and that's a bit over a litre. If you're American you'll have to make your own calculations from that.
For the two flavours I chose mint and chili but actually apple jelly can be flavoured with almost anything, so experiment!
For the mint jelly take a pint of juice, a pound of sugar, 60ml light vinegar (white wine or cider), the juice of a lemon and a quantity of mint. I used a quarter cup (yes, I know, it's about two tablespoons or 60ml by volume) of dried mint but I would have preferred fresh mint. If you have it chop it finely until you have about two tablespoons full... Some people add a drop of green colouring and so might I have done if I'd had any, but use something naturally derived and avoid the chemicals.
Dissolve the sugar in the juice, add the vinegar, lemon juice and mint and bring to a boil. Boil hard for as long as it takes to set, this will probably be more than ten minutes but not more than twenty. I test for set with a teaspoonful of mixture onto a cold plate. Allow to cool a little then push it gently with your fingertip. If wrinkles form ahead of the finger then it's ready to pot. This is the moment to add your colouring if you're using it.
Be very careful not to burn yourself in this next stage. Pot into hot, sterile jars and put the lids on immediately.
For the chili jelly use a pint of juice and a pound of sugar as above. I didn't add any lemon or vinegar and don't think it's needed. Add two teaspoonfuls of dried chili flakes at the start of cooking and proceed as for mint jelly. One problem I had with mine was the flakes floated to the top during cooling. You can get around this by allowing the jelly to cool slightly before bottling but I really like the security of hygiene gained by doing everything while it's boiling hot.
Use as relish for savouries and as a surprise in puddings.
Anyway, on a walk on Sunday we found a hedgerow apple tree where the fruit, and I hesitate to call them crab apples because the tree looked more like a seedling from an eating apple, were heavy, dark and pendulous. Oh no, that's the Rocky Horror Show, I meant to say heavy, enticing and nearly ripe. So I picked a bagful.
This is what I did with my free harvest.
Actually I made more jelly than that, nearly 1.5kg I think although I've not weighed up, but jars are boring to photograph and this presentation nearly shows the luscious shinyness of the of the finished preserves.
To make, chop your apples up skins and all, just removing any bad or bruised bit and put in a thick bottomed pan with just enough water to cover the fruit. Gently bring up to a simmer and allow the apples to cook until they are soft and broken down. Mash them a bit to make sure all the pieces are fully cooked. Then set up your jelly bag and set the pulp to drip for several hours. Don't squeeze the bag if you want clear jelly.
After a few hours, measure your juice. I got 2 pints, 40 imperial fluid ounces and that's a bit over a litre. If you're American you'll have to make your own calculations from that.
For the two flavours I chose mint and chili but actually apple jelly can be flavoured with almost anything, so experiment!
For the mint jelly take a pint of juice, a pound of sugar, 60ml light vinegar (white wine or cider), the juice of a lemon and a quantity of mint. I used a quarter cup (yes, I know, it's about two tablespoons or 60ml by volume) of dried mint but I would have preferred fresh mint. If you have it chop it finely until you have about two tablespoons full... Some people add a drop of green colouring and so might I have done if I'd had any, but use something naturally derived and avoid the chemicals.
Dissolve the sugar in the juice, add the vinegar, lemon juice and mint and bring to a boil. Boil hard for as long as it takes to set, this will probably be more than ten minutes but not more than twenty. I test for set with a teaspoonful of mixture onto a cold plate. Allow to cool a little then push it gently with your fingertip. If wrinkles form ahead of the finger then it's ready to pot. This is the moment to add your colouring if you're using it.
Be very careful not to burn yourself in this next stage. Pot into hot, sterile jars and put the lids on immediately.
For the chili jelly use a pint of juice and a pound of sugar as above. I didn't add any lemon or vinegar and don't think it's needed. Add two teaspoonfuls of dried chili flakes at the start of cooking and proceed as for mint jelly. One problem I had with mine was the flakes floated to the top during cooling. You can get around this by allowing the jelly to cool slightly before bottling but I really like the security of hygiene gained by doing everything while it's boiling hot.
Use as relish for savouries and as a surprise in puddings.
Monday, September 10, 2007
Mind the Gap
Another long absence, sorry. Reasons are I'm not in Normandy, I've not been doing much interesting cooking; living on take away and snacks and my motivation is low. However, enough of the excuses. Bread may be the staff of life but ciabatta are the comfortable old slippers of easy living.
I'd like to start by saying all bread is easy to make. All bread is composed of nearly the same ingredients and it is primarily the proportions of those ingredients and the method of treating them that produces the magnificent range of this essential foodstuff across the world.
So, as we learnt at school, bread is a combination of flour, water, salt and yeast and is still bread even if you leave the last two ingredients out. You can add fats, flavourings, non-wheat flours like corn or buckwheat (yeuchh), extra fruits, vegetable or nuts but none of these are essential. For a well risen yeasted bread the flour should have a good gluten content, for flat breads this is not so important and these differences in flour across the world have informed the style of bread made locally.
Ciabatta is an Italian invention, using an overnight yeasted preparation called a biga which is made up the next day into a very soft, almost sloppy dough. The biga allows a small amount of yeast to multiply itself up to a sufficient quantity to raise the loaves, the overnight wait produces a slightly fermented flavour which adds to the character of the bread. Olive oil is added to enrich the dough. The finished bread is light and chewy with a good crust and an open texture.
Italian bread uses a mediumly high protein/gluten flour which allows big bubbles to expand in the dough without bursting and subsequent collapse while retaining a tenderness to the bite so for best results try to get hold of some real Italian flour, the extra strong sold for bread machines will produce a tough loaf.
Because it is such a wet dough it can be difficult to knead by hand. Some people will work it on a board, my partner has a wonderful open air stretching technique that pulls the dough from hand to hand without ever allowing it to flow to the table, I used a professional bread mixing machine because I could.
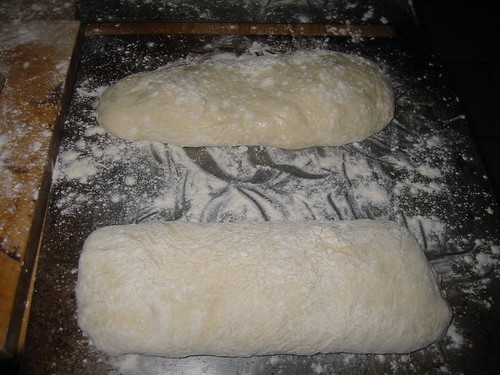
After the dough is kneaded it must be allowed to rise for a while, traditionally described until it has doubled or trebled in size which may take an hour or may take four hours depending on other variables like the heat of the kitchen. Then, and it is almost a pouring action, carefully tip your dough onto a well floured board and with a pastry scraper or knife divide it up in to loaves, which are gently formed into the slipper shapes of the finished bread. This stage is important because the dough has a delicate structure, full of air, and this needs to be preserved.
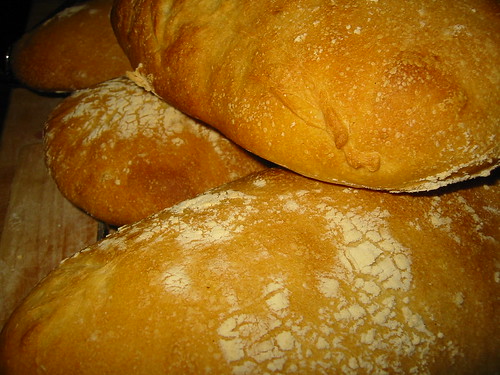
After a further proving (see above) the loaves are baked in a very hot oven for about 20 minutes until brown and lovely.
I'd like to start by saying all bread is easy to make. All bread is composed of nearly the same ingredients and it is primarily the proportions of those ingredients and the method of treating them that produces the magnificent range of this essential foodstuff across the world.
So, as we learnt at school, bread is a combination of flour, water, salt and yeast and is still bread even if you leave the last two ingredients out. You can add fats, flavourings, non-wheat flours like corn or buckwheat (yeuchh), extra fruits, vegetable or nuts but none of these are essential. For a well risen yeasted bread the flour should have a good gluten content, for flat breads this is not so important and these differences in flour across the world have informed the style of bread made locally.
Ciabatta is an Italian invention, using an overnight yeasted preparation called a biga which is made up the next day into a very soft, almost sloppy dough. The biga allows a small amount of yeast to multiply itself up to a sufficient quantity to raise the loaves, the overnight wait produces a slightly fermented flavour which adds to the character of the bread. Olive oil is added to enrich the dough. The finished bread is light and chewy with a good crust and an open texture.
Italian bread uses a mediumly high protein/gluten flour which allows big bubbles to expand in the dough without bursting and subsequent collapse while retaining a tenderness to the bite so for best results try to get hold of some real Italian flour, the extra strong sold for bread machines will produce a tough loaf.
Because it is such a wet dough it can be difficult to knead by hand. Some people will work it on a board, my partner has a wonderful open air stretching technique that pulls the dough from hand to hand without ever allowing it to flow to the table, I used a professional bread mixing machine because I could.
After the dough is kneaded it must be allowed to rise for a while, traditionally described until it has doubled or trebled in size which may take an hour or may take four hours depending on other variables like the heat of the kitchen. Then, and it is almost a pouring action, carefully tip your dough onto a well floured board and with a pastry scraper or knife divide it up in to loaves, which are gently formed into the slipper shapes of the finished bread. This stage is important because the dough has a delicate structure, full of air, and this needs to be preserved.
After a further proving (see above) the loaves are baked in a very hot oven for about 20 minutes until brown and lovely.
Subscribe to:
Posts (Atom)