Tuesday, June 28, 2011

Marinated Artichokes

artichoke harvest

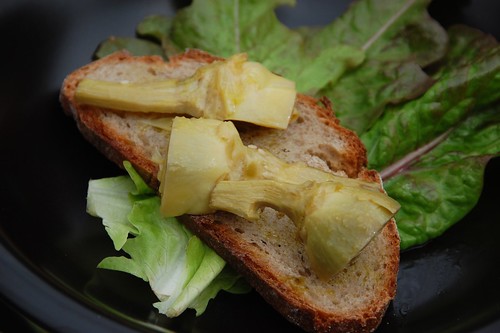
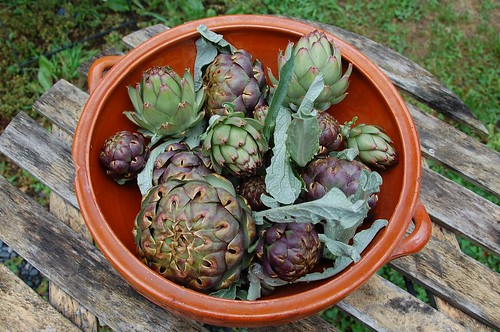
A couple of weeks ago I took the harvest from two artichoke plants. Home grown artichokes, at least the ones I grow, are not as large and imposing as the sort grown in Brittany (and California) on farms dedicated to their production and tend to become tougher sooner but picked young they are still a worthwhile and delicious crop.

In an attempt to preserve some of the goodness for enjoying later in the summer these were marinaded in the jar, soaking up garlic, lemon and oil, making them ideal for adding to pizzas, sandwiches and as a salad garnish.

They are a bit tedious to prepare and if you're not aggressive enough with the trimming you may leave some tough bits behind which will detract from the finished product.

Pick your artichokes before they are much more than 5cm in diameter, keep a short stem as on young flowers the stem can be trimmed and eaten too.

Recipe:

Baby artichokes with short stems, enough to fill 1/2 litre jar after prep.
Salt
10 ml Lemon Juice (for precooking)

Marinade:
60 ml lemon juice
60 ml oil, light flavoured or olive or mix
120 ml 5% cider or white wine vinegar
2 cloves of garlic, large slivers (about 6 pieces)
1 green chilli pepper if liked
1.5 tsp salt
1 tsp sugar
10 ml balsamico

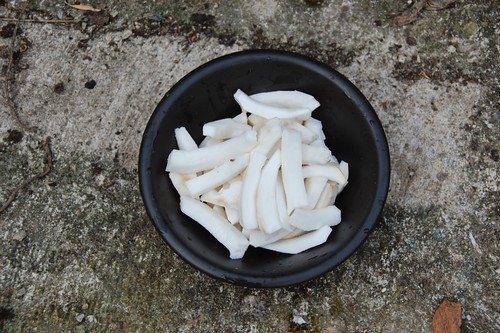
Prepare artichokes, trim off tough outer lower bracts, peel stem, cut off top and discard. Tiny ones can be left whole, larger ones must be halved or quartered and checked for choke - remove if necessary.

Add salt and 10 ml juice to pan with prepared artichokes and add just enough clean water to cover. Bring to a boil and simmer for 10 minutes until artichokes are tender. Drain.

Pack into warm sterile jar whilst still hot.

Mix the marinade ingredients together in non-metallic saucepan and bring to a boil, pour over artichokes in jar tucking chilli and garlic down the sides with a clean spoon. Top up with boiling water if necessary. Seal with lid while hot.

Allow to cool, keep in fridge for 10 days, then use as required. Will keep for a few weeks in the cold, for longer storage they will need hot water bath processing after packing.

marinated artichokes

Saturday, June 18, 2011

Pop-up Underground

potato with tofu scramble
Tofu Scramble with dutch oven roasted potatoes - the potatoes are that odd colour because they have a lot of blue colour in them naturally.

I did a whacky and slightly scary thing today. I announced on twitter that I would be doing a pop-up restaurant event in the autumn. I've no idea what made me do it, but it's said now, so that's what must be happening.

What's a pop-up underground restaurant? It's pop-up because it's available for a very short time. Pop-ups typically appear in unused spaces or non-food locations and after one or two nights, the show is over and they're on their way. Underground restaurants serve meals open to the public but hosted in private homes. It's on the edge of legality and most underground venues release their location on a need to know basis. Successful underground restaurants may have regular calendar dates scheduled for meals.

There is either a charge per head or donations are taken for the cost of food and preparation. Alcohol can't be sold, that really is illegal, but patrons are allowed to bring their own. The menu is fixed, sometimes themed and served supper style with all guests receiving each course at about the same time. Sometimes tables are shared as space is usually very limited in a domestic setting.

Have a look at MsMarmite's blog - she was certainly the first underground restaurateur I came across and is a great read. But of course, I've never eaten there because the food isn't vegan. It's too much to expect small concerns, often one person bands, to make extraordinary efforts to feed vegans if their usual metier is more mainstream. Which is where I come in...

I'm hoping to do at least one event in the UK this autumn, more if venues can be found so that the vegan supperclub joy can be spread around the country a bit. This really is a project that's just hours old so nothing is fixed at all yet, but it's going to happen.

Watch this space.

Friday, June 17, 2011

No Knead Bread

no knead bread
There's no need for that

Although I find a batch of no-knead dough in the fridge invaluable for flat breads and pizzas this attempt at a full sized loaf failed technically as it was under developed, under proofed and sadly a bit under cooked too. The last two can be blamed on the cook but the method really doesn't quite cut it for me on the texture of the finished loaf.

Still, I like to think it has a nice friendly appearance, don't you?

Tuesday, June 14, 2011

A stew for summer

summer stew

The summer vegetables are beginning to be plentiful enough to make whole meals. This very simple little stew uses small artichokes, freshly dug floury potatoes and the tiniest just forming broad beans in their pods, each no longer than half my little finger.

For one person:

2 small artichokes
2 small/medium potatoes
about 15 baby broad beans or french beans
Olive oil
Garlic to taste
Juice of one lemon
Boiling water
1 tsp. sugar
Salt to taste
Green herbs (parsley, coriander) for garnish.

Prepare your vegetables. The artichokes need trimming around the base, the tough scales removing and the chokes scraped out, easiest if they are cut into quarters first. Make sure you get all the coarse bracts/leaves trimmed because they're a bit chewy otherwise at serving.

I peeled the potatoes because the variety has a dark skin that colours the water but it's not essential with light coloured sorts. Cube or slice in pieces to match the artichoke sections for size.

The beans should have any flower debris removed and be washed but need no other preparation.

Put the artichokes and potato in a heavy pan with a good dollop of olive oil. This is an essential part of the dish so don't skimp. Allow the vegetables to cook gently for 10 minutes or so, keep them moving so they don't stick. Throw in the garlic if using and stir.

Add about 250ml boiling water, the lemon juice, sugar and salt to taste. This will take a lot of salt because of the lemon and potatoes and it's good to add some at this stage but be a little cautious, much easier to add a little more seasoning at the end than take it out.

Bring back to a brisk simmer for 15 minutes or so. Serve in a bowl, with liberal chopped herbs and lots of bread. Eat with a spoon to enjoy the delicious salty, lemony, oily broth. Can be served hot or at room temperature.

Sunday, June 12, 2011

Eating Greens


The Mr. has been here for a few days. One of the meals he requested was green vegetables, cooked. In the picture above is the selection I chose for him from the garden, rainbow chard, mixed leaf cabbage and the ubiquitous invasive weedy tree spinach called Magentaspreen.

Green Leaf Lunch

The chard was stripped from its stems, the stems cooked briefly in boiling water and the leaves steamed above, drained well and dressed simply with lemon juice and salt.

The cabbage leaves were shredded finely and stir friend with cumin, mustard seeds, ginger and a little onion.

The tree spinach was blanched, drained, squeezed to remove excess moisture and dressed with soy sauce, a little balsamic vinegar and topped with gomashio.

I served the three dishes with a miso soup.

Sunday, June 05, 2011

Wet

burger

It's a rainy Sunday in old Normandy and I've spent the day doing nothing much in particular despite a plan to stay in the warmth of the kitchen being cosy.

However, I did take time to make some flapjacks from this recipe using black treacle instead of golden syrup and replacing 30g of the oats with 50g of desiccated coconut which worked rather well and baked a couple of bread rolls to go with a commercial burger for my tea.

By the way, do any blogger users suffer from blogger placing the html code for a blank.gif randomly within the text each time they insert a html link using the editing tools or is just me?

Friday, June 03, 2011

A lovely bunch

cocowhole

I'm a great fan of coconut and I used to use a lot of tinned coconut milk but recently, examining the ingredients listed on the label I've discovered that the proportion of actual coconut in most brands of can has decreased and the space is now taken with thickeners and fillers. Not good. I decided that my use of tinned milk would cease but replacing it with fresh coconuts is quite hard work. Your coconut should be fresh and healthy looking, they don't keep forever so buy it from a source where you know the turnover is good.

cocojuice

First you have to poke its eyes out with a strong skewer. You'll need to poke out at least two and ideally three before the liquid inside will pour out easily. This juice can be used in cooking if it smells pleasant. If it doesn't your coconut is probably a dud and should be discarded.

cocoinspect

It always helps to get a second opinion from an expert at this point.

cocosplit

Opening a coconut open is hard. Some people drop them from high places on to hard floors, I prefer a trusty and weighty hammer. Mind your fingers and tap it firmly on the equator, it should crack and then it can be broken apart.

cocoshelled

Then you have to take the meat from the shell. It's usually possible to pry chunks out by slipping a knife blade or a spoon handle between the white part and the outer shell. A little gentle pressure should encourage large pieces to spring out but sometimes it's very tightly attached, all you can do is break the shell smaller and move on the next step.

cocopeeled

Having taken the flesh from the shell the thin brown skin must be peeled off, leaving only white coconut meat. I cut mine into fingers because I had some foolish idea I could use a little mini-hachette to grind it for me, but it was too tough for such a small machine and I ended up grating it by hand.

cocograted

The grated coconut can now be used to make coconut milk by adding hot water and straining or can be used as it is in curries and chutneys. It can also be frozen if you can't use a whole coconut's worth at once.

It's a lot of work so I've not given up on all coconut products, coconut butter and oil are useful and so is creamed coconut, sold in hard blocks that can be dissolved in hot liquid for cooking.

Thursday, June 02, 2011

It's pizza it must be Italian...

white pizza

I read an awful lot of pizza menus while I was away, I don't recall potato appearing on any of them. Still, the white pizza was represented in a few places and I've always enjoyed the carb hit from a dose of spud on dough, chip butty or foreign.

This was cooked using a tip I picked up on David Lebovitz recently or was it the Pioneer Woman, either way it wasn't exactly something I didn't know already but a useful reminder. To overcome the limitations of my underpowered and inadequately regulated oven I used a preheated cast iron pan for the dough which gave something that much more closely resembled the wood fired oven pizzas I love the best.

Make your favourite pizza dough. I have to admit this one was the absolute simplest I could do but actually that's not a bad thing. For the topping I used 100g of soy yoghurt mixed with a couple of tablespoons of nutritional yeast, a glug of good olive oil and plenty of freshly chopped garlic. The potatoes were some of the batch I cooked yesterday, waxy early season sorts that slice neatly. I'm sure that with a decent oven you could use raw potatoes but that's really not an option with the set up I'm currently using. A proper wood fired oven is on the list but probably not this year.

Get the oven hot, and heat the pan on the hob. Be careful, it's hot. Lightly oil the pan.

Roll or pat out the dough to shape - mine is oval to match the pan, it's not a photographic fail. When the pan is hot, drop the dough into it, then I kept mine over a low heat while I spread the yoghurt garlic base and arranged the potatoes. I sprinkled some chopped cornichons over as I had no capers but capers are best. Dress the top with a little more oil and pepper and put in the oven for ten minutes.

Finally add some torn basil leaves and cook for five minutes more. Tonight I'm enjoying this with a 2006 Cotes de Roussillon which is much better than I expected and I hope I can find some more.

Wednesday, June 01, 2011

Dinner for one

Stuffed Peppers with Smashed potatoes

I'm beginning to think I should retitle this blog, My Struggle with Eating. Anyway, today's strategy was to be in the kitchen making lots of things, as if I was cooking for several.

So I made carrot pickles, gomashio, a big pot of boiled potatoes for use over the next couple of days and some stuffed peppers.

The pickles very nearly ended in disaster, I'd bought a huge pack of 'economy' carrots expecting to get two or three large jars of pickles stashed away from them but they were in such poor condition that most were thrown away as soon as I opened the bag. No economy there.

To stuff the peppers I used what the French call blonde lentils, large green ones, the cheaper sort, not from Puy. They're healthy and taste fine. I mixed them with some bulgar wheat and lots of green garlic and ginger. The large green pepper was cut in half, filled with the cooked lentil/bulgar mix, placed in an oven proof dish with some water to keep everything moist and baked for about an hour.

To serve with them I took some of my pot of boiled spuds, crushed them with the flat side of a knife and roasted them with olive oil and salt at the same time as the peppers. It's a good way of making dull old potatoes more interesting and they can be flavoured as you like, with extra herbs or spices.

It wasn't the best meal I've ever had but it's a marked improvement on the slops I've been eating. Things can only get better.