Monday, November 08, 2010

Waffle waffle waffle

cusinart waffle iron

I had a good birthday for cooking aids. This lovely shiny Cusinart waffle iron was a present from my son and I've been trying some different recipes to see how to get the best of it.

First of all I went for the absolutely most simple recipe I could find, based on this one called Frasvåfflor (you'll need to scroll down a bit to find it.)

Lacking enough vegan marg. I made substitutions and came up with this;

60g neutral flavoured vegetable oil
125g soya milk
100g flour (I only had spelt)
1 tsp. baking soda
1 tsp. lemon juice
1 tsp. vanilla essence.

This made four waffles, which were nice enough to look at but really tasteless.

So the next experiment used this recipe:

(based on the one at GroupRecipes)

115g strong white flour
115g rye flour
115g spelt flour
(the reason for this odd mixture of flours is that I only seemed to have a lot of strong bread flour on hand and thought it would make the waffles tough. Substitute 345g of plain or cake flour or use half that and half fine wholemeal flour)
50g sugar - white, brown, whatever
1 teaspoon (about 9g) baking powder
pinch of salt

25g light vegetable oil
350g non-dairy milk
170g water (you may not need all of it)

Get your waffle iron hot before you start to mix.

Weigh and mix the dry ingredients. Weigh the wet ingredients and add to the dry. Mix well. You may not need all the water but I found the mix much too thick in the original recipe and needed to thin it down a bit.

This makes about 12 waffles in the Cusinart. Ladle a good tablespoon onto each section and spread it a little bit.

Close and cook to your preference. I found these needed about 4 minutes and could maybe have taken a little longer if they were to be eaten immediately. As I was expecting to freeze them, I took them out before they were perfectly golden to allow for further browning in toaster.

They freeze well, allow to cool, bag up with some parchment paper dividers and toss in the freezer. You can then remove one or two for breakfast and reheat in the toaster from frozen. Almost as good at the freshly cooked ones.

waffles

Friday, November 05, 2010

Mofo Day 5 - Greek Chickpea Soup

Greek Chickpea Soup

Another reason for hating the winter, flash photography.

Recipes pop up in all sorts of unlikely places. My pointer to this absolutely classic simple Greek staple came from Agricultural Biodiversity, a site which brings together all sorts of interesting things about humans, crops and the wild relatives that spawned them. Today a link there about the European Food Information Resource took me to a recipe file (it's a downloadable .pdf) where I found the recipe.

The original (on page 51) made far too much soup for two and I wanted to use the pressure cooker to reduce preparation time, so I soaked 500g chickpeas in hot water for two hours and then pressure cooked them at high for 20 minutes. Half the chickpeas were put aside for another dish and I continued with the remainder.

250g chickpeas (dry weight)
Water
1 large onion
70g Extra virgin olive oil
Juice of 1 lemon
15g (1 scant tablespoon) white flour
7g (1 heaped tsp) salt

Soak the dried chickpeas overnight (for about 12 hours) in a bowl of cold water, then rinse them thoroughly and place in an uncovered saucepan filled with water over high heat. When the water starts to boil, skim off the foam which forms on the surface and reduce the heat to a medium temperature.

After 10 minutes, add the onion and the salt (the onion is added at this early stage so that it can dissolve and blend into the soup). Add hot water as required during cooking so that the chickpeas don't dry out and stay "soupy".

Test the chickpeas whilst as they cook until they are soft. This will take about 2 hours. Or speed this step up by soaking the chickpeas in hot water for a couple of hours and then pressure cooking according to your pressure cooker's instructions. You can add the onion and salt to the pressure cooker at the start or in the next stage.

Take about a quarter to a third of the cooked chickpeas from the pan and mash them with a potato masher or stick blender. Return the chickpea pulp to the pan and stir in. Add the finely chopped onion and salt now if it's not already in the pan, and cook for a few minutes until soft. Bring the volume up to about 1 litre with more hot water if needed.

Mix the lemon juice and the flour in a bowl and add to the soup. The amounts in the original recipe are a bit odd, I think for 500g chickpeas as described it should be 30g white flour or two tablespoons. The flour both thickens the soup and helps the olive oil stay in suspension. The lemon juice is for flavour so adjust to taste but you'll need at least one whole lemon's worth. Allow the soup to cook for 15 minutes or so to cook the flour and meld the flavours.

Then add the olive oil and simmer for a few minutes more. It should be comfortingly thick and simple. Add some chopped green herbs if you like.

Serve, with bread, salad, olives, vegan cheese or whatever.

Thursday, November 04, 2010

Wednesday, November 03, 2010

Aubergine Tikka

Aubergine Tikka

Instant Fail on VeganMoFo as I totally didn't make the necessary post for yesterday. In my defence, well, there isn't very much, but that post will be along shortly, probably in the company of several others.

So, this is a meal I cooked for myself about three weeks ago. An Aubergine Tikka Masala. The sauce tasted great but was strangely unappealing to the eye (and not entirely like the original) so for now, here is how I made the Aubergine Tikka part without a Tandoor.

Cut large aubergine(s) (it's delicious, do plenty!) into biggish chunks, they will shrink by about 50% when cooked so cut with an eye to finishing with bite sized pieces for serving.

Sprinkle a good teaspoon of fine salt over the pieces and leave to degorge for about an hour. Now, this step is often regarded as unnecessary with modern varieties of aubergine but the point here is not to remove bitterness but to slightly dehydrate the fruit so that it will absorb more of the marinade in the next step.

When the pieces are oozing liquid, squeeze them dry. You can rinse the salt off first if you like, probably a good idea if you have high blood pressure but rinse quickly and squeeze well.

Make a marinade of 100g non-dairy yoghurt, a tablespoon of mashed garlic, a tablespoon of grated ginger and a half teaspoonful each of ground turmeric and a good red paprika. These spices will help with the colour. You can also add a little garam masala or your favourite curry powder if you like but don't overdo it.

Mix the dry aubergine into the marinade so that it is well coated and leave for an hour.

Heat your oven to hot.

I used a hob to oven pan for this, a wonderful cast iron oval skillet which holds a fearsome heat. Heat your pan up as hot as it will go on the hob with just a splash of rapeseed or peanut oil in it. Put the pieces of aubergine in, with the marinade still clinging to them, making sure they are well spread out. Turn them over so that they are sealed on all sides.

Add a sliced chilli and some finely sliced onion rings and pop the whole pan into the oven for about 15-20 minutes until the aubergine is richly golden.

Serve with naan breads, a raita, salad and other curries.

Monday, November 01, 2010

Decisions, decisions.


Whose idea was it to run VeganMoFo actually in the same month as NaNoWriMo? For someone with a very limited ability to get myself motivated even as far as making breakfast it is definitely taking the piss. I don't think I can do both and my ability to choose rationally is pretty poor too, so I may end up doing nothing at all.

Anyway, I can at least have a go at blogging this. For my birthday, a whole month ago now, I received a kit of secret powders and special tools so that I could start to experiment on the rather well trodden paths of molecular gastronomy.

I'm still learning techniques at the moment so it will be a while before our meals start to show much influence from the higher echelons of fancy cuisine and even longer before I'll have any original recipes to share but for the moment please be amazed by my first attempt, a beetroot caviar.

Thursday, October 14, 2010

Foraging

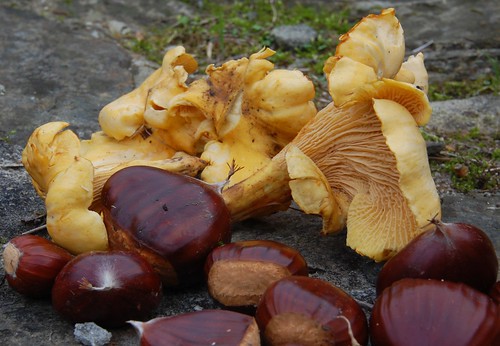
chanterelles and chestnuts

One of the best things about living on the edge of a forest with your own land is that wild food collection is as easy as stepping out to the vegetable patch. Today I went out for the first of the sweet chestnuts and scored some lovely wild mushrooms too.

Even so I was about to consign them to the fridge and have a slice of bread for supper when the phone rang and Mr. Stripey told me not to be so silly. So I made the fancy dinner I'd planned whilst walking around the fields.

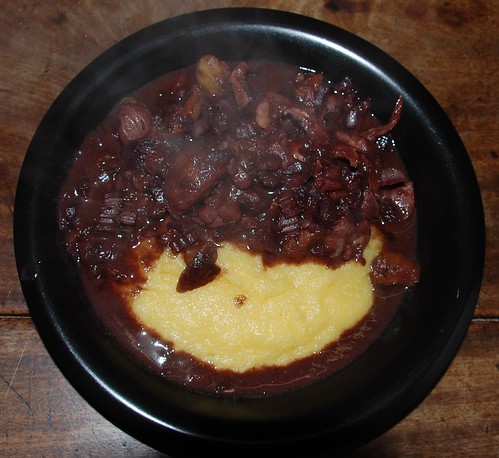
chestnuts and polenta

It's nothing more complicated than a sweet chestnut and chanterelle stew served with a big dollop of comforting polenta to soak up the red wine sauce.

Sweet chestnuts look a little like horse chestnuts but the green cases are much much spikier. Wear gloves to collect them and pick them over carefully. Any that are not plump within their chestnut skins aren't worth having and any with tiny holes will have a worm living inside, so best discarded.

Chanterelles are some of the easiest wild fungi to identify but it's still worth doing your homework before heading out to the woods. You can substitute any sort of edible mushroom if you can't find any.

To serve four, although perhaps not with quite such large portions as the one I gave myself you will need:

300g fresh sweet chestnuts.
100g fresh wild fungi (or use oyster mushrooms from the supermarket)
Olive oil
1 medium onion
2 stalks of celery
2 cloves of garlic
300ml red wine (I used a supermarket brand Merlot)
20g dark miso
15g ready made Dijon mustard
Black pepper and salt.

Peel the chestnuts by slitting the hard brown skin and pulling it away. It should separate easily leaving a thinner pinkish skin over the nut. Bring a pan of water to the boil and drop the chestnuts in to simmer for about 10 to 15 minutes. Refresh in cold water and peel off the thin underskin. This isn't particularly easy and if you've left them to simmer for too long the nuts will crumble. Just do your best.

Clean and slice your mushrooms. Heat a clean pan and add a big slug of olive oil to it. Quickly fry the mushrooms until they have lost moisture then, retaining as much oil as possible in the pan, remove them to a warm dish to rest until needed.

In the same pan and oil as you cooked the mushrooms, cook the finely chopped onion and celery until they start to brown. Season with plenty of ground black pepper and add the crushed cloves of garlic. Stir everything around then add 300 ml of wine. Bring to a simmer and allow to reduce for five minutes. The liquid should reduce to about half its original volume.

Mix the miso and mustard with 200ml of cold water and add it to the pan stirring well to combine. Add the peeled chestnuts and stir, then cover and keep over a low heat while you make the polenta.

I used five minute polenta made according to the packet. At the end of cooking add a good measure of a well flavoured olive oil or some of your favourite vegan margarine and keep warm.

Add the mushrooms to the pan of simmering chestnuts and mix well together.

Serve a dollop of polenta for each diner topped with chestnut and chanterelle stew. Make sure everyone gets their fair share of the gravy. Decorate with finely chopped parsley or chervil if liked.

Eat immediately with a glass of good red wine.

Saturday, October 09, 2010

Indian Summer

I was born in an indian summer. My mother tells me she sat in the hospital gardens with me, mothers in those days spent 10 full days in hospital, and we soaked up the unseasonal sun together.

This year, my birthday was grey, wet and cold but after a week when I was sure that autumn had set in properly the skies cleared and the temperature rose. The perfect moment for a celebration drink I've been meaning to share all summer.

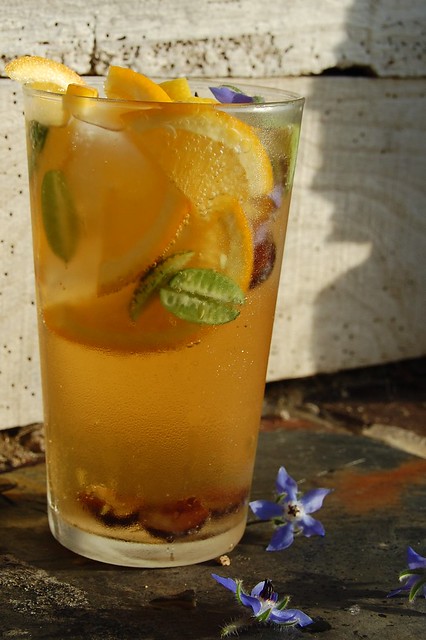
pimms

The fruit punch bases known as Pimms are very traditional English drinks and the most well known version is based on gin, the quintessential English spirit. It's almost impossible to buy the branded version in France, a secret recipe which has been guarded since 1823.

However, it is possible to create a home grown equivalent which is almost as good. Serve it with plenty of ice, slices of orange, lemon and cucumber, add small pieces of aromatic soft fruit like peaches or melon, a sprig of mint (not in picture!) and decorate with borage flowers. You can make it in a jug or the glass but it's a long drink. Serve it in an old fashioned half pint dimple mug or use a straight pint glass as I did.

To make a full 750ml of Pimms No1 style basic alcohol fruit cup mixture which will allow you to make over 3.5 litres of drink you will need:

300ml Dry Gin (no need to use a Bombay Sapphire or other expensive brand)
300ml Italian Red Vermouth (again, pick one you like but it doesn't need to be expensive)
150ml Orange Curaçao (Cointreau works)

If you mix these in a 750ml screw top bottle you can keep it in the fridge and serve yourself delicious drinks on any sunny day that calls for it.

To serve, take your glass and half fill it with ice. Add a measure of Fruit Cup mix and fill the glass with fruit and flowers. Top up with 3-4 measures of lemonade, soda water, tonic water or a mixture to taste. The final alcohol content will be about 6%, equivalent to a strong beer or half the strength of wine so take care and drink responsibly.

Saturday, September 25, 2010

Saturday Breakfast

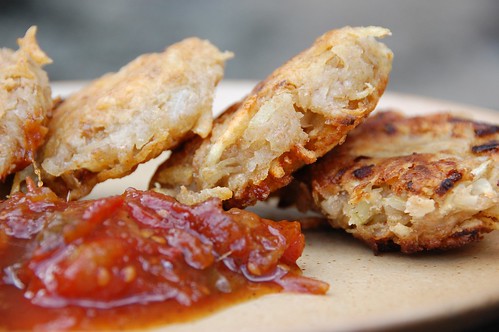
latkes tomato jam breakfast

Latkes with Tomato Jam, served with a big mug of coffee.

Back soon.

Saturday, September 11, 2010

Beetloaf

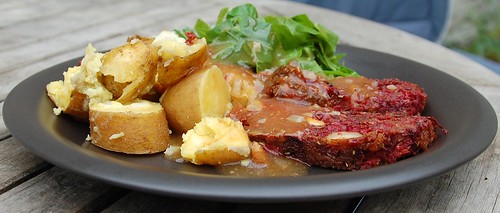
beet loaf

This is a favourite recipe I don't make often because I'm too lazy to do the grating required but it's filling, tasty, economical and, dare I say it, good for you. It's also just the sort of no-nonsense old fashioned vegetarian home cooking I crave from time to time.

The recipe makes a large loaf tin roast which can be served straight from the oven, eaten cold with bread or crackers or reheated in a sauce so despite making six good servings it's ideal for the single diner. I've never tried freezing it but I'm sure it would.

You will need:

250g grated potato (about one large, well scrubbed so no need to peel)
250g grated beetroot (about 2 medium. Scrub them well, no need to peel, trim the root end and use the leaf stem stubs to hold the root while you grate it)
150g finely chopped onion
100g fine breadcrumbs, wholemeal is best.(I used my coffee grinder to make mine!)
100g coarsely ground nuts - almonds, walnuts, cashews, whatever. (the grinder struggled here, and few nuts were left whole which was rather nice)
75g tahini (or peanut butter or if all else fails a tablespoon of oil)
2 tablespoons soy sauce
black pepper
2 tsps dried herbs (thyme, sage, mixed, de Provence) or the equivalent in fresh

Mix the vegetables, crumbs and nuts together. Dilute the tahini with the soy sauce and mix everything together with the pepper and herbs.

Bake in a well oiled loaf tin for about an hour at 180C. Line the bottom of the tin with a strip of oiled baking parchment if the turning out whole is important but usually you'll get away with it anyway. Allow to cool in the tin for 10 minutes and then turn out to decorate in whatever retro fashion floats your boat. I've seen meatloaf recipes suggest masking in tomato sauce or ketchup even. Interesting.

I served mine with dutch oven steamed potatoes and leaf cabbage, dressed with an onion miso gravy.

Friday, September 10, 2010

Ketchup catchup

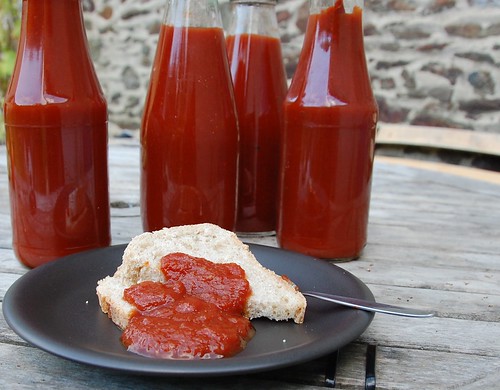
tomato ketchup

This is what I made with the pot of tomatoes I was working on yesterday. Two litres of simple, rich, thick tomato ketchup.

Last year I tried quite a range of different recipes for tomato jams and ketchup and they were good but they weren't quite the same as the thick red gloop of my misspent youth. This is much closer to the mark and has no garlic or onion in it.

You will need 9 litres of fully ripe, washed and roughly chopped (in halves or quarters) red tomatoes and a pot big enough to take them all. I'm not sure what the weight is but I'll be filling the pan again tomorrow and will weigh it then for an update. *** UPDATE *** The weight of tomatoes in my pan full is about 7kg/15lbs.

Without adding any extra water, set the pan of prepared tomatoes over a low heat until the juices start to run, then give it all a good stir and turn the heat up for 20 minutes or so until the whole pan is full of soft, cooked tomato goodness.

Turn off the gas and allow to cool a little. This is for your comfort, so if you can take the heat move straight onto the next stage.

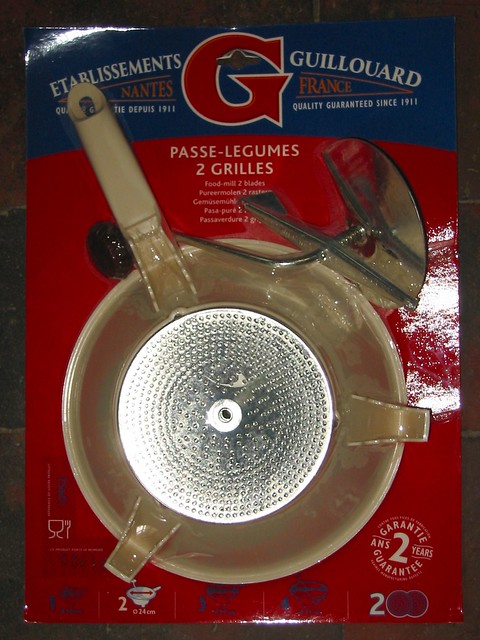
Run the softened tomatoes, skin, seeds and all through a food mill. You'll need something like this, I bought mine four years ago and it's still going fine.

food mill

This will remove the seeds and any lumpy bits but still press most of the skin and flesh through. When it's all done you'll have reduced the volume in the pan to about 6 litres.

Put it back on the heat, bring to a simmer and allow to reduce, stirring frequently to avoid it catching, until it's 3 litres, a half of what you started with. A big preserving pan with graduations on the side is helpful but you could use a ruler. Measure the depth of liquid when you start and stop when you get to half of that. It does take a bit of time so keep yourself busy in the kitchen while it does its stuff.

Add to the pan, 500g white (or any colour you fancy!) sugar and 500ml of 5% (or greater) vinegar - I used a 5% cider one. Season with two teaspoons of paprika, 1 teaspoon of ground allspice, 1 teaspoon of cinnamon and three dried red chillies. The spicing is up to you, this is lightly fragrant. If you use whole spices you'll probably want to strain them out before bottling. Add 25-30g good salt. I used sea salt.

Stir everything in and then reduce the volume again to two litres. You'll need to stir much more frequently now and the sauce will spit so use a long handled spoon, wear an oven glove or wrap your hand in a tea towel to avoid burns.

When the sauce is reduced it should be thick enough but you can reduce it a little more if you like a really rich dollop with your chips.

Pour into warm sterilised bottles or jars and seal the lids. If you want you can heat treat this for longer keeping. Put on the caps but don't tighten and process in a simmering water bath with the water up to the neck of the bottles for 25 minutes, then remove and tighten caps. We'll use it all up before it has a chance to go off so I haven't bothered. Refrigerate after opening.